Desert Online General Trading LLC
Dubai, United Arab Emirates
Desert Online General Trading LLC
Dubai, United Arab Emirates


✨ Elevate your airflow game with style and strength! ⚡
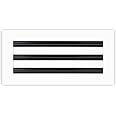
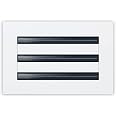
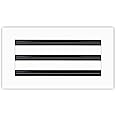
The 14x6 White Modern AC Vent Cover by Texas Buildmart is a commercial-grade, decorative aluminum vent designed for ceilings, walls, and floors. It features a sleek linear slot diffuser that fits standard 14x6 duct openings, supports 256 CFM airflow at 9.8 ft/s, and installs via a hidden screw system for a clean look. Perfect for modernizing any space with durable, easy-to-clean, and paintable vent covers available in multiple sizes.


| Manufacturer | Texas Buildmart |
| Part Number | 14x6 |
| Item Weight | 2.07 pounds |
| Product Dimensions | 16 x 8 x 2 inches |
| Item model number | 14x6 |
| Is Discontinued By Manufacturer | No |
| Size | Neck: 13 3/4" x 5 15/16" -Face: 15 9/16" x 7 5/8" |
| Color | White |
| Finish | Finished |
| Material | Aluminum |
| Shape | Rectangle |
| Installation Method | Screw-In |
| Item Package Quantity | 1 |
| Number Of Pieces | 1 |
| Air Flow Capacity | 256 Cubic Feet Per Minute |
| Head Style | Philips |
| Performance Description | 256 CFM @ 9.8 FPS |
| Measurement System | English/Standard |
| Mounting Type | Screw-In |
| Special Features | Easy to Install |
| Batteries Included? | No |
| Batteries Required? | No |
J**J
Great quality
Amazing, a great modern updated look fornour home love it.
L**A
great product
HVAC system - good flow, noise level has decreased. diffusers work great. good value for money. nice looking, took a little time to install 11 vents but worth it.
B**S
New vents, new clean fresh look
I'm rehabbing a condo that is about 25 years old... after giving my interior a fresh coat of paint, my old vents were an eye sore. These are very easy to install, clean seamless look. What an easy upgrade. The only downside is the price, I do think they are overpriced.
N**K
[Updated] Looks/functions great when installed...but delicate/frustrating installation.
Pros: The construction/build quality is quite good for a vent cover -- all metal, beautifully painted and welded, with metal clips holding six all-metal black interior adjustment fins (see below for more about these guys). No overly-sharp edges, which is useful if you need to engage with it a lot (again, see below). It looks great after installation, a huge improvement over cheap-looking vent covers from the 60s that are somehow still used in construction to this day!Cons: Installation/design-placement of interior mounting screws. Basically, the black interior fins can pop out of their retaining clips when moving them to install the interior mount screws (4 provided, but depending on your fit, you might not need any). It is difficult, but not impossible, to reinsert the fins into their (independent) rails and then into their (shared) clips -- which clips can also shift out of place if you are not careful doing the aforementioned digital acrobatics. At one point I had three fins pop off, and I though it was hopeless I would ever get it back together again. Over the next 45 minutes, however, I figured out how to reinsert the fins into their respective rails and clips, but it was hardly easy or fun.
L**G
Cost effective update
We updated our 1990's hvac grates with these vent covers in minutes for <$500. They look high end and clean once installed, probably added $20,000 in curb appeal. No UV yellowing after a year.
J**N
It's like that kids' game Operation, just with vents and drill
I bought about twelve of these in varying sizes to replace all the old crappy vents that came with my home, at least in the public areas. Unfortunately, once you start you can't really stop unless you like having an inconsistent design, and these are pretty pricy, so just keep the following in mind.The quick and dirty: If "looks" are your primary criterion, the price doesn't scare you, and you're open to a lot of potential blood, sweat, and tears getting these installed-- AND you don't mind the fact that you're going to have a wind tunnel white-noise style sound effect once installed, these are great vents.The Good:- Look Great! Modern and clean with thick solid aluminum. These bad boys definitely won't rattle- Highly adjustable louvre designThe bad:- Expensive- The louvre design might allow for adjustable air flow, but they are an overengineered nightmare-- heavy, difficult to manipulate, and need to be moved with a spatula or they WILL scratch- Everything scratches easily. The white finish, the louvres-- both are going to get dinged or scratched if you are not PRO tier with your drill.- Wind Tunnel sound effect. Doesn't matter if you leave all the louvres open-- these are noisy. Not crazy loud, but you WILL hear them.- These screw in from the sides. Your existing vents no doubt screw in from the bottom. Unless your ductwork and drywall finish out was done properly (hahah yeah right) you WILL encounter the installation difficulties mentioned below.Ok, so you want these vents. They look great and that's what's of prime importance to you. Ok, here's what you NEED to know so you don't mangle the first vent on the Altar of Learning, and don't make ten trips to Home Depot.1) These don't "cap" your vent holes, the frame itself inserts into the hvac duct boot. That means if you have a 12x6 vent hole, and buy a 12x6 vent, if the vent boot is even 1mm bent, or has mastic/glue smeared on the inside, they won't fit. They built these to EXACT size, and not even 1mm smaller. And the bigger the vent, the more likely your boot is warped or has mastic/mud caked in it. Be prepared with dremel, pliers, etc to scrape and bend your boot so the vent will fit.2) Drilling the supplied self-tapping screws through the folded over lip of your hvac boot is a fantasy. Either you will scratch the hell out of the louvres trying, or strip the screw-- probably both. Drill pilot holes first.3) If using these as a Return, don't even *bother* trying with the louvres in place-- it will be noisy, will restrict airflow, and probably wear out your air handler motor.4) Make sure the louvre fins are centered BEFORE installing the vents5) Anything over 12x12 needs two people to install. These things are too heavyStuff you really need to install these right unless you have perfectly installed vents:1) A rubber mallet to hammer these into tight hvac boots2) 1" self-tapping screws because using the 2" ones provided on smaller vents, or tight fitting vents, is just dumb and risk drywall damage or having to deal with a joist.3) A 1/16" carbide or titanium drill bit for making pilot holes. This is essential.4) A dremel or metal file to shave off mastic, mud, and worst of all tiny galvanized steel "pins" that secure the folded over collar of your hvac boot. These stupid things are the "1mm" that will make you cry and prevent the insertion of the vent.5) Sheetrock repair material and paint6) Touch up white/black enamel in case you scratch the vent7) A stiff rubber spatula for adjusting the louvresGood Luck!To the manufacturer:Great looking vents, but PLEASE:1) Sell a model without the louvres, with the clamps painted black to be used as Returns. I have an entire garbage bag filled with heavy steel fins I will not be using..2) For the love of almighty, make these 1-2mm smaller than the boot size. You give 2" screws to reach the edge.3) The louvres are total overkill, heavy and scratch easily. I'm generally against plastic when steel is available, but here is a perfect exception. If you're going to go metal, at least powder coat them instead.4) use spring loaded instead of screws for smaller vents
D**H
Awesome Replacement Vents!
My house was built in 1973 and originally used a swamp cooler. After modernizing to AC years ago, I was left with the old swamp cooler vents which are loud and have little control leaving the house uneven with hot or cold spots everywhere.After replacing with these BUILDMART Linear Slot Diffuser, the house is more even, less noice, the design allows heat/cool without the direct blowing of other vents in one place and nothing elsewhere... More even if you will.I highly recommend these for older houses or any house. These look better, work better and just overall are better.NOTE: The screws are hidden on each side and not seen once installed.1: Depending on the age of your house, it may require a liitle work to get something to screw into!2: Use a long 4" - 6" inch #2 bit on your screw or ¼" impact gun to ease install.3: If your duct work in not really square, just work with it until it does, gently with a small hammer in the corners.
Trustpilot
2 weeks ago
1 week ago