
DOWNLOAD THE APP


Customer Services
Copyright © 2025 Desertcart Holdings Limited
DOWNLOAD THE APP
🧲 Elevate your ideas on a sleek, magnetic glass canvas that means business.
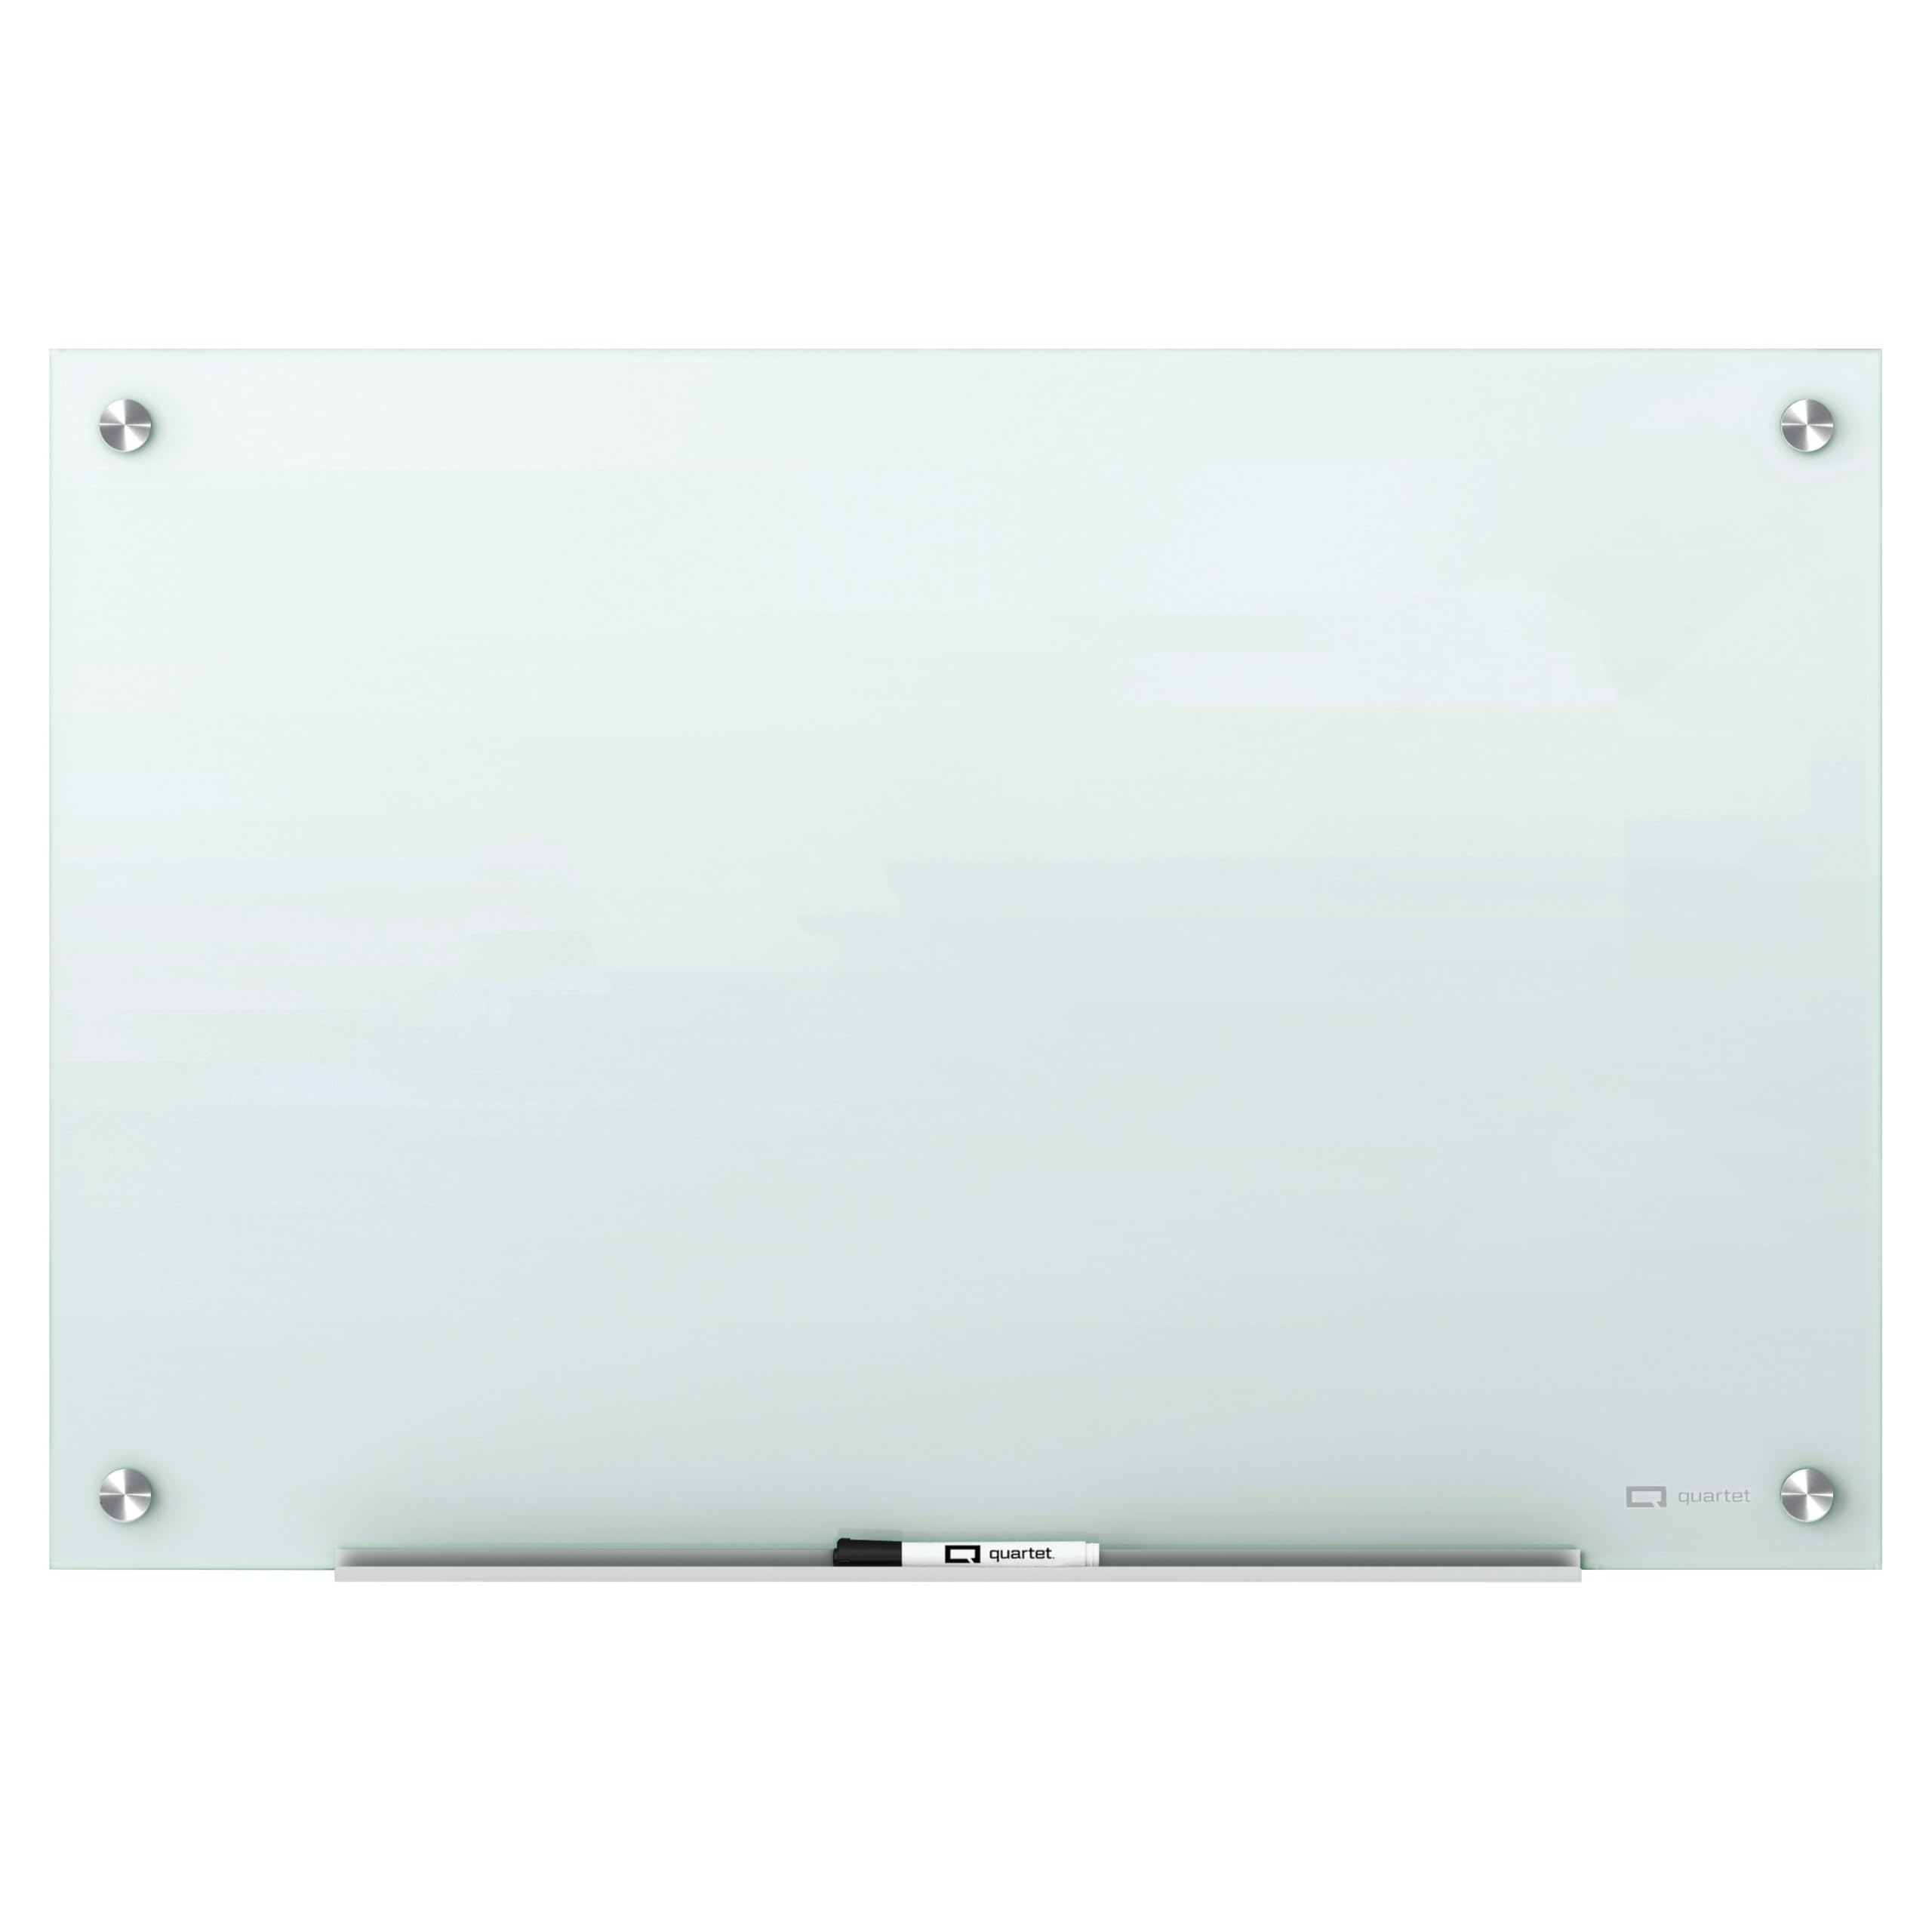
The Quartet Magnetic Glass Dry Erase Whiteboard (36" x 24") combines a frameless, modern glass design with a durable, scratch-resistant surface that resists stains and ghosting. GREENGUARD Gold certified for healthier indoor air quality, it features a magnetic steel-backed surface with included high-powered magnets, a removable accessory tray, and easy pass-through mounting hardware. Designed for heavy use and backed by a 15-year warranty, this board is perfect for professional offices, schools, and home workspaces seeking a stylish, long-lasting presentation tool.


| ASIN | B00H2XMIX0 |
| Additional Features | Dent Resistant, Dry Erase, Magnetic Surface, Scratch Resistant, Stain Resistant |
| Best Sellers Rank | #4,435 in Office Products ( See Top 100 in Office Products ) #46 in Dry Erase Boards |
| Brand | Quartet |
| Brand Name | Quartet |
| Color | White |
| Customer Reviews | 4.3 out of 5 stars 2,785 Reviews |
| Frame Material | Alloy Steel |
| Global Trade Identification Number | 00034138201145 |
| Included Components | Removable Accessory Tray, Marker, High Power Glass Board Magnets |
| Item Dimensions W x H | 36"W x 24"H |
| Item Weight | 18.2 Pounds |
| Manufacturer | ACCO Brands |
| Material | Alloy Steel, Glass |
| Material Type | Alloy Steel, Glass |
| Mounting Type | Wall Mount |
| Occasion | Birthday |
| Orientation | Vertical |
| Product Dimensions | 36"W x 24"H |
| Recommended Uses For Product | Community Center, Home, Office, School |
| Target Audience | Business Professional, Parent, Student, Teacher |
| UPC | 034138201145 |
| Unit Count | 1.0 Count |
| Warranty Description | Standard |
| Writing Board Type | Whiteboard |
E**G
Beautiful but installation requires 3 people - here's some tips
The board is beautiful, and we bought the 6X4 which has 6 mounts. It's very heavy and is a 3 person job minimum to install (don't even try with 2, it's not worth the risk of dropping). I followed the review by John B. Hartleb, who explained some tips on how to install, and took a lot of his tips in mind to install the board. Here's my findings and some tips from installing it in our conference room. 1. 3 people - 2 to lift, one to mark the wall and drill. 2. Pro tip: get a table and stand it against the wall. Use a level to get the table level as possible. To get the height right, use 12 packs of soda to rest the board on so your 2 buddies won't get tired, and the board will still be perfectly level! (see pic) (the blue tape is to catch the dry wall when drilling so as not to make a mess) 3. One the board is lined up with the wall, mark the top 3 center holes to drill, then move the board away. Drill with a 11/64" drill and the anchors will go in perfectly into the wall. The screw in the 3 back anchors. Then have your buddies hold the board up as you screw in the top anchors for the top 3 anchor holes. 4. Top anchors: John's review said to lubricate, but this was not necessary. If you need a little more torque I put blue painters tape on the top of the top anchors to get some more leverage to turn them. This made it way easier. Don't turn too much as you're literally screwing into glass. Just tighten until it's snug. 5. Now the board is hanging by the top anchors only and the bottom is free swinging. You can get rid of the table and cases of soda to continue the remainder of the installation. Lift the bottom edge of the board so it's about the same distance away from the wall as the top. Mark the direct center of the hole in the wall (don't get lazy about lifting the board because if you mark the hole when the bottom is closer to the wall, the center won't be dead center and your anchors will be off). Now drill the holes and repeat installing the anchors. 6. Bottom anchor points: so as you will need a little bit of play, install the bottom anchors first for all 3. Once they're all aligned up and poking through the board, then screw in the tops anchors. Now you're done! Other notes: like others said the magnetic surface on this because of the thick glass vs. thin iron sheet requires to have VERY strong magnets to have anything stick on. As you see in my first pic, There is a dry erase cubby and dry erase erase that are magnetic that are on a metal rail. These did not stick on the board. The board comes with 2 very strong magnets so you can hold up paper on the board. I guess if you want more, you will have to order from Quartet. Dry erase markers: The pen that the board came with is really high quality stuff. We have other dry erase pens from "that brand that everyone associates with" and on glass it's a little wet. Note if you try to erase it while it's "wet" it will streak and be hard to wipe with a dry erase eraser. It's much easier to erase after it's dried. If you do have issues because you tried to erase it while it's wet, the good news is that because it's glass, a simple wet paper towel will wipe it right off, no ghosting!
N**E
Nice quality board, with a few install issues
I read a lot of reviews on this product before purchasing. A lot of people complained about the mounting hardware, so I bought my favorite anchors from Home Depot in advance. I also recently bought a $30 Tacklife laser level from Amazon and used it. After it arrived I wondered if some of the reviews were out of date. The mounting hardware looked pretty solid to me. It was also the kind that can be installed without a drill, so that would be nice for some. I used my anchors, but I would think that the factory ones would work as well. The box also comes with a piece of car board to make a template. They call it a template, but it has you mark the drill holes, so it’s not a complete template. When hanging I placed the laser crosshairs where I wanted to top left mount. Then installed both top mounting anchors and the bottom left on the laser lines. I mounted the board loosely on the top two and then drilled the bottom right. I did this all by myself and had help a room away if I wanted it. I’m pretty handy and a bigger guy, but it really wasn’t hard to install by myself. If you can comfortably lift the full box by yourself you can probably install without help, if not, a second person is needed. The glass itself takes special markers that work slightly better than the regular dry erase markers. All do work though. There is a quartet magnetic eraser as well That Is recommend if you get the magnetic version of this board. The bottom tray does not hold on well by itself. Any adhesive that is rated for glass and plastic will work fine attaching. I used some putty epoxy, but if I had clear gorilla glue or super glue, that would have been my first choice. The only other drawback is that the board flexes a little bit. It’s noticeable when you are writing, but is not hard to work around. It makes it feel a little cheaper to me. If it bothers you a spacer could be installed behind the board to reduce it, but I have not done that. Overall, I would recommend, because the look is great when it is up, and I think this will hold up well over the long run.
M**S
Appears Quartet has listened to customers and made some improvements for install
I recently bought and installed this whiteboard, and I wanted to provide some feedback on some apparent improvements Quartet has made for customers. First, Quartet provided a large "template" sheet for marking hole locations. I say "template" because it doesn't have preset mark points. You still have to lay the whiteboard over the paper and mark the centers. Special note, when marking the center, the true center, use additional lighting to cancel out the shadows. This is a recess, so light from a side will cast a shadow and make it look like center is in a different place. Even a phone LED camera light will do well for mobile lighting to find the actual center. I marked my holes and taped the big paper to the wall. I used nothing else to align or check fitment and just YOLOed it. When you tape, make sure you spend the time to level it and have it nice and flat. I taped the 4 corners plus the 4 centers and made small adjustments until I was happy. I drilled 7/32" holes through the paper, then removed the paper, and installed the drywall anchors provided. Two, the drywall anchors appear to be improved. These are the same style but appear to be a heavier duty version, metal I believe. Past reviews showed white plastic anchors. Mine were silver and appeared to be a cast metal of the same "screw" style of anchor. It went in well, no complaints. Three, there were complaints about the threads being bad. Quartet shipped the mounting hardware threaded together. I don't know if this is how it's normally shipped, but this choice does mean someone is hand threading and checking the threads during final assembly. This might be a choice to self QC these parts by forcing pre-assembly at the factory. When I got my parts, I had to unthread the two metal halves. The threads seemed good and worked fine with no anti-seize required. Final thoughts So how'd I do? Well, I just went for it just to see how things would turn out. It turned out good. Everything aligned well, assembled easy, and I can't really complain. It was not a hard one person job and all of 10 minutes of work. It probably took longer to unpackage than install, and the only thing that took time was taking some care to mark the true centers and to lay the big paper on the wall well. Alignment options Let's say you mess up a little bit. What are your options for alignment? There is a small amount of wiggle room in two places. There is some wiggle room in the hole for the small, long screw going into the drywall anchor. You should be able to loosen this and move the metal cylinder part around a small amount side to side to gain a small amount of extra clearance if needed. It's not a lot of play, but it's some. There's also a little bit of wiggle room in the hole of the whiteboard, so the whiteboard does have a little play in the design. Combined, it might be able to compensate + or - 1/8" or so. For the most part, just take your time marking the center well and use a secondary light source that you can move around. This will probably take care of most of the fitment problems people have. Also spend time getting the paper nice and flat, both underneath the whiteboard when initially marking centers and when taped on the wall. Take a little time at both these steps, and you should be golden. Even for me not really taking any additional steps, I was probably within a 1/16" of center to center between the worst two holes (bottom left, top right) for alignment relative to each other's ideal. Is the whiteboard any good? Yea. It's got a metal back for magnets, but the magnets need to be strong to also have enough strength through the layer of glass. Magnetic strength drops off fast relative to distance away, so layer of glass means powerful magnets are needed. As long as you're aware of that, great. The stock Quartet stuff works good. If you get aftermarket magnets, just look for higher strength stuff. That's it. The glass is of course nice to write on, so it's too functions well. It's hard to complain about a glass surface, aka why I bought this one. The slight 3D effect from the glass layer and the white backing is neat/interesting. Good or bad? I don't know. The whiteboard still functions well. The hardware that came with the whiteboard is certainly decent enough for the price point. I would not expect more, so it's perfectly acceptable for the price and ultimately looks good and a little upscale. The packaging is ok. There was plenty of use of foam on all sides and in the corners. The glass whiteboard arrived in good shape. I can't say if it'd ever take a real fall or toss, but the outer carton is clearly labeled "glass," so hopefully it's handled well enough. Mine was. Nothing was missing on arrival. Instructions were simple enough to follow and had enough information to where I was not questioning anything. I'm a poor use case though. I'm already pretty handy, so this is kind of eyes closed stuff for me. But the key bits of information like what drill bit size was readily found in seconds. No complaints.
J**F
Good value, shipped very well.
Looks great, sturdy, high quality, and not too difficult to install. Like other reviewers, I recommend using the cardboard box to create a template of the board, tracing out the hole locations, so you don't have to hold the heavy board in place to mark the holes. In addition, I recommend drawing a straight line between the center of the top two holes and using that line to level the cardboard. My only complaint is that 1 of the 4 anchors fell through the drywall as I tried to tighten the screw on the standoff, leaving a 1/4" hole in the drywall. That was super easy to fix, just by backing out the screw and buying a toggle bolt at Home Depot. I used at 3" long x 1/8" toggle bolt, and just pulling back on the offset while screwing eases the screw into the toggle and opens it up. I would suggest to actually start with the toggle bolt instead of the plastic drywall anchors since it's easy to make tiny adjustments to the position in case the holes don't line up perfectly the first time, and it should hold a lot more weight. Like others, I noted that some markers barely mark the board. For example using my pack of thin expo markers, the Red marker hardly marks the board at all, but in the same pack, purple looks pretty solid. I'll experiment with a few marker types, but I don't think it will be a problem. [Update: Bought a third board, and after accidentally breaking one of the stand off posts (with a hammer), I was able to get a hold of their customer support and they shipped me out a new set of posts for free. Also, don't use a hammer.]
M**T
33" hole spacing??? really??
Just why? The board is great... once you get it on the wall... I got the 36 x 24in board and it is unnessesarily difficult to install. I just had to install it for a second time/ was just reminded how horible this thing is to get right on the wall as I just moved and had to reinstalled it... You have about 1/8th of an inch of wiggle room accross all of your wall mounts due to them using bolts that fill up the entire holes and I just haven't seem to ever get it right. They also designed it to have 33" hole spacing.... I.E. you're on, at best, the edge of 2 studs if you're lucky to install it on an exterior wall... Just why... Add clearance and use washers to give us more room and move the holes on the glass in 1in total so it actually lines up with studs. BTW, I have all the bells and wistles and do plenty of DIY, have hung up much more difficult items (or atleast should be harder than something as simple as this). Idk, I have little to no patience for such poor design on a literal flat piece of glass.
P**N
Beautiful looking with some minor faults
I've hated how ugly whiteboards look for years, so when we found this glass whiteboard, we immediately ordered one for the home office. Due to the size and weight (I ordered the 4x6 size), the product ships with appointment delivery. The packaging arrived this morning completely beat up to the point that the delivery fellow suggested we open the package to make sure the contents weren't broken. Thankfully it was not. The 4x6 size which does flex, so that can feel a bit nerve racking carrying up the stairs. As other reviewers said, it would have been nice if this whiteboard came with a mounting template since it's heavy enough to be a pain to measure directly on the wall. We ended up using a laser level, screwed a support plank into the studs where we wanted the whiteboard to sit, and propped the whiteboard up on that to determine where the holes should go (and for drawing circles on the wall). I recommend discarding the drywall anchors that come with it (they are the cheapest anchors ever) and getting your own sturdier ones (I used toggle lock anchors) as I wasn't confident with what came with the package. This whiteboard IS magnetic, which was a happy bonus, but because the metal backing is very thin, you may not be able to use regular magnets. (I've attached a picture to show what the back looks like.) The board comes with two rare earth magnets that seem to hold to the board pretty well. It also comes with one marker which was already dry and pretty unusable. The board doesn't lie flush to the wall, but rather protrudes about a 1/2 inches out, so when you are writing in the middle the board you can see it flex a bit, but so far it's holding up ok and I think it's normal. Overall while the board does have its faults (mounting hardware especially), it's the best alternative to the standard whiteboard I've come across. Once installed, it looks great and is worth the hassles.
L**S
Highly recommend this board
I purchased nine Quartet Infinity Magnetic Glass Marker Boards, 36x24, white G3624W on March 5, 2015. Package contains: * One Magnetic Glass board * One tray for markers/eraser * Two magnets * One black marker Pros: a) Beautiful, clear flat surface for writing. I note this because this replaces another board, that I purchased, that rippled and waved which I have also reviewed on Amazon. b) My Quartet Infinity is mounted vertically as the area of my old board would not support the weight of the Quartet Infinity and the new open area was too small to mount horizontally. The marker/eraser tray is 23 ½ inches so it fits perfectly along the bottom vertical edge of board. c) It wipes clean with the only the dust from the marker remaining. Very nice. No ghosting. d) A black or blue marker shows really well but stay away from green as it blends with the board. e) I ordered 1/2 x1/8 inch Neodymium magnets disc N48. I reviewed these magnets in regards to usage with my old board and they were great. With this new board the glass is thick and one of these same magnets is still capable of holding up an 8x11 inch card stock but that is about the limit. I would recommend a larger neodymium magnet with this board. As a side note the two magnets that come with the board are a high quality and very strong. f) So it doesn't feel slighted, the black marker is also very nice and smooth to write with. Now stop pouting Mr. Marker. Cons: a) None. It is as stated. Conclusion: The board is mounted using four screws that hold four dry erase boars. Once the boars are attached you gently screw in the caps leaving each one loose until all the caps are installed then hand tighten. The carpenters' that installed these had a brilliant idea, they made a template of the cardboard package by cutting a rectangle the exact size of the board and marked four screw holes. I don't recommend you trying to install board by yourself as they are bulky. I highly recommend this board. Purchase with confidence, install and let your writing juices flow.
P**R
Proper magnets is a MUST!
Board looks great! Issue: Does anyone know what type of magnets actually hold literally a single piece of paper on this specific board? $50 bucks and counting on magnets...extra strength. Tried recommended- They slide after minutes of hanging or don't hold period. Board is amazing if I could only find the proper magnets :) Many thanks!!!
Trustpilot
3 weeks ago
2 weeks ago