
DOWNLOAD THE APP


Customer Services
Copyright © 2025 Desertcart Holdings Limited
DOWNLOAD THE APP

✨ Clear the way with PLATINUMEDGE – shine bright, drive safe! 🚗
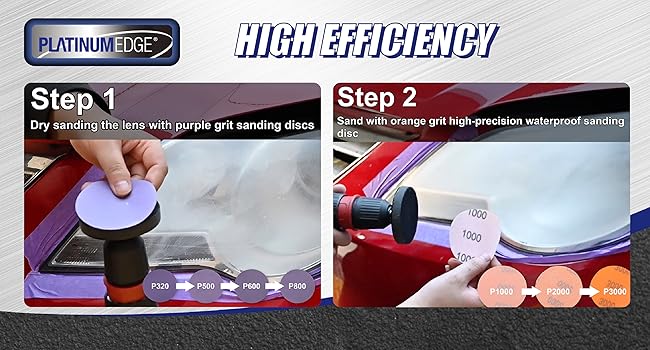
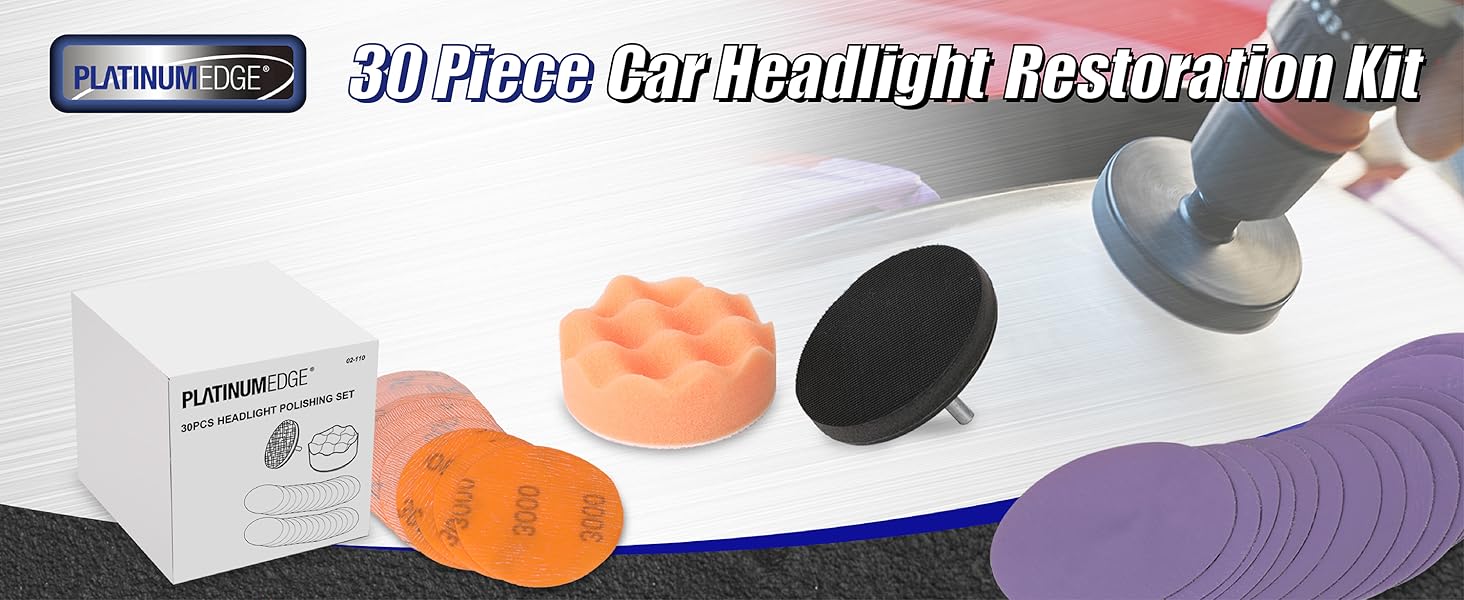
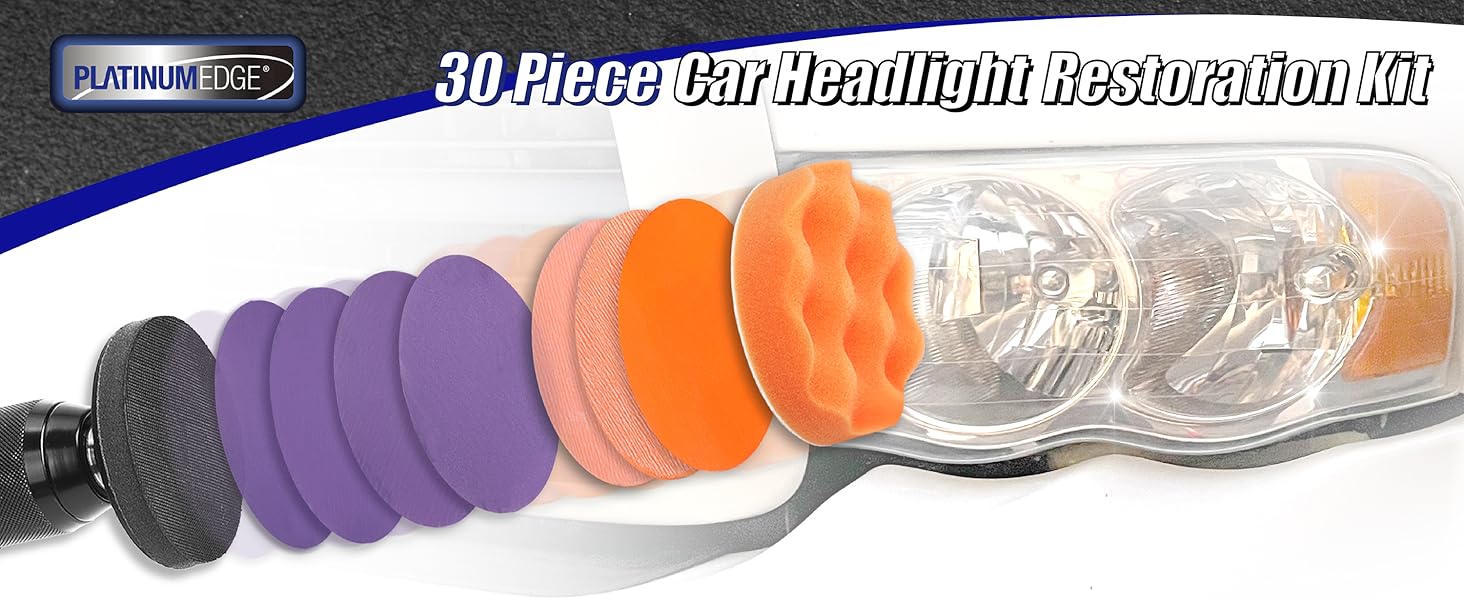
The PLATINUMEDGE Car Headlight Restoration Kit is a comprehensive 30-piece set featuring multi-grit sanding discs and polishing pads designed for drill use. It effectively removes yellowing and haze from various vehicle lights, restoring crystal-clear clarity and enhancing nighttime driving safety. With easy-to-follow steps and versatile application, this kit delivers professional results and long-lasting headlight renewal.


| ASIN | B09P9Z258L |
| Best Sellers Rank | #54,970 in Automotive ( See Top 100 in Automotive ) #71 in Automotive Headlight Restoration Kits |
| Brand | PLATINUMEDGE |
| Customer Reviews | 4.3 4.3 out of 5 stars (947) |
| Date First Available | December 28, 2021 |
| Item Weight | 4.6 ounces |
| Item model number | 02-110 |
| Manufacturer | Jiangsu Sainty Sumex Tools Corp Ltd |
| Manufacturer Part Number | 02-110 |
| Product Dimensions | 3.1 x 3.1 x 3.5 inches |
F**.
Great set with plenty of discs for multiple applications.
Came with plenty of discs to work the yellowing of both of my headlights. One suggestion is if you have sharp corners, it would probably help to remove the headlight rather than mask the bumper. I have a few spots I could not reach very well and ended up having to partially remove my bumper to get to those spots. Definitely take their suggestion and do not use more than needed as the build-up of material will make them useless. The polishing pad worked great with an aftermarket plastic polish.
K**T
Trust the Process - Great Product
This is a great product and works just as described. Like others said, you have to trust the process . As you work through the different dry blue sandpaper discs it looks very cloudy that almost makes you think you made a big mistake. However once you move to the orange wet discs it starts to look better but the plastic polish is what makes it so clear. Here are some pictures from start to finish.
S**L
Works great - Needs a few more grits
It's December, 2023. This worked great on a 2008 Honda Fit's headlights that has lived most of it's life away from the shade. These headlights were pretty rough. I did the passenger light with only the kit (and used an entire kit), and all of the haze is gone, but there are still micro-cracks that won't polish out and need a layer of material removed. I really needed to start at 240 grit. I wound up using 180 grit and then moved to 240 on the driver side headlight before I even used an entire kit's worth of discs for each headlight. I had a black & decker orbital buffer and just used meguires compound and polish with SEPTA pads for the last step. They look new now, or better than new. The only downside is, this is a lot of manual labor. This will take hours to do properly. Many hours. You need to use plenty of body tape (green stuff if you can find it, or many layers of blue and reapply when it gets wet and peels off) or you will accidentally burn through your paint.
A**A
Good, cheap set to renew your headlight.
Sanding discs 320,500,600,800,1000,2000 and 3000 and a foam buffing pad. Also comes with a drill attachment. I sanded my headlight with every grid and then compound and finally polish. My headlight now looks white and clear. Don't forget to use a UV protector to preserve the clear look. The sanding discs are good quality. The drill attachment has a foam base which helps the sanding disc to conforms to the curvature of the head light. The drill attachment is stable and didn't wobble during use. Very impressed for this price.
C**0
Great kit for the price.
Great kit for the price. An expansive variety of sanding discs to get you going from start to finish. The velcro backing is a nice addition, simply peel off the old pad and stick on a new one. I refinished 3 sets of headlights this week using these and some T-cut polish, with excellent results.
W**M
Does what it's designed to do, Patience grasshopper........
You can see Before, During, and After photos. The After..After photo (That I didn't take) looks even better once I sprayed it with soapy water and rinsed it with clean water. I Only used the polishing pad from this kit, and Chemical Guys headlight restored. Items used- Milwaukee cordless drill Foam polishing pad Chemical Guys Headlight Restorer Tap water in a spray bottle I added 4-5 dime sized blobs of the Chemical Guys Restorer to the polishing pad, hit it with a spray of water, blotted the polish onto the lense, and began to polish. I have an Acura TL, and the headlights with the blinker wrapped around take up a large area, I worked 1/4 to a 1/3 of the light at a time, if the compound started to dry before I was finished, I would spray it with water and continue polishing. After I was finished, I used 5000 grit wet dry sand paper on a very very small area, just to see if it would polish up even higher. The recommendation is using 800, 1000, then 2000, and 3000, Then polish...... I only tried 5000 after on a small area, Before scratching the entire lense. Honestly, I buffed that small area 3-4 times with the polishing pad and compound, and those faint scratches are still stere. I am very happy I did not do the entire lense. That being said, perhaps there is a finer compound to use after sand paper, then use the polishing compound. BUT, the way the lights turned out WITHOUT Sandpaper, I am perfectly fine doing this process anytime its necessary, and Never use sandpaper.
A**R
Worked great
I just used this kit to refinish my son's 2006 Audi a4 headlights that were in bad shape. This kit is great, I wish I had before and after pictures. The lights look new. I also used mequires plastic polish as a final prep step, and mequires headlight clear coat to protect them.
W**C
It's simple enough and they still failed...
Poor construction leads to damage. First off, the spongy backing pad for the various discs is uneven. No matter how carefully I applied pressure perpendicular to the multiple curvatures of the headlight, there was always a circular scratch being left behind. The feelings are because of two things wrong with it: First what's the uneven pad density. Secondly, one section of the edge of this velcro copy material was disintegrating which then allowed the sanding pad to float freely as opposed to being firmly attached to the pad . I ended up having to hand sand the final four stages to minimize the damage; not eliminated . Very disappointing!
S**N
Terrific, low cost solution to restore aging headlights. Important to follow sandpaper grit in every sequence, I wet sanded from 1000 to 3000 grit. Initial sanding process with 320 is tedious and time consuming as you remove worst layer of headlight damage, each step gets easier- stick with it! Final step is with enclosed waffle pad and cutting compound ( not included) The headlights are nearly as new looking at this point, you will need a sealant like McGuire headlight spray to finalize. Final result is very professional.
S**S
Absolutely amazing for 16.00 bucks!!!!! Follow the instructions and you will get professional results. Tools required, a good high speed drill or polisher, patience, masking tape, highly recommend a compressor with a blow tip to clean pads after they accumulate plastic dust - as they will last much much longer when blown clean, a little understanding on how to sand and polish without burning plastic bits , you will also need plastic polishing compound such as McGuires. People complain about wet sanding ruining pads, the instructions DO NOT call for wet sanding at all. Keep things dry, wiped and clean and you will be amazed. These pictures don’t even do it justice as to how bad the headlights were and how clean they are now. I’ll add more pics in the daylight. I plan to re apply the plastic polish every few months for protection and maintenance. Sanding kit, compound and fully upgraded led headlights totalled about 92.00. This beauty will be able to see the dark side of the moon.
C**K
They were good for starters but a bit small when you get to 3k or 5k. The big 3x5 hand pad are better and easier and produce a better finish.
D**G
This kit is perfect. Ecactly what you need for restoring headlights. I like the all the different grits of sandpaper that this kit includes, so you can work your way up to get a perfect finish. I'd still recommend polish and a sealant after sanding done.
9**S
I bought this to use it to polish my headlights. The different grit sandpapers held up well in wet sanding. I only used the drill attachment for the roughing part. Dry sanding it. Then wet sanded by hand as I went up from to, 800, 1000,2000,and 3000. Then polished it with plastx and sealed the headlight for uv protection. The sandpapers worked well. I still have extra sandpapers left as they came with extras per grit grade.
Trustpilot
2 weeks ago
3 weeks ago