

🧽 Transform your walls like a pro—DIY texture mastery at your fingertips!
The Patelai Knockdown Texture Sponge (2-pack, 13x15x6 cm) is a durable, washable porous sponge designed for quick and easy drywall texture repairs. Ideal for matching light to heavy knockdown and popcorn textures on walls and ceilings, it empowers DIYers and professionals to achieve seamless finishes with minimal mess and maximum efficiency.


| Best Sellers Rank | #3,643 in Tools & Home Improvement ( See Top 100 in Tools & Home Improvement ) #22 in Wall Surface Repair Products |
| Brand | Patelai |
| Color | Yellow |
| Customer Reviews | 4.3 out of 5 stars 1,606 Reviews |
| Material | Sponge |
| Recommended Uses For Product | DIY texture repair and patching on walls and ceilings |
| Special Feature | Durable |
| Surface Recommendation | ["wall", "ceiling"] |
Q**N
Good texture sponges for your money
I soaked them in a small bucket of warm water about 15 minutes and they expanded to the fullest. Squeeze water out, let them air dry and they were ready to use. Good product
M**T
Worth it
I have the old popcorn looking texture in a couple of rooms. These texture sponges work. They match exactly to the popcorn texture. Worth the money.
W**Y
Good sponges, easy to use, and they do the job.
They are good sponges that work ok. You might have to do some further shaping to get the degree of knockdown texture you want, but that's a personal preference. They certainly worked to help me finish a touch-up area.
A**R
You must get it wet before use!
You have to get the sponge wet first and let it dry to expand! When I first opened this, I was very concerned and immediately ran to the one- star reviews. It’s a totally flat weird looking pair of “sponges” that come inside of a tightly vacuum sealed plastic piece. Even after sitting on my shelf open for a week, one of them had maintained complete flatness and the other had perked up only slightly. I planned to return them, but when I looked at the other reviews, I realized some people have pictures of good sponges and other people had pictures that looked like mine. So I decided to take one of the flat weird looking objects and get it wet under warm, running water. It started to fluff up a little, but not much. I then set it on the counter and left it for the day. When I came back later, I was almost laughing because it looked so different. it had fluffed up into an awesome looking sponge. I then added water to the other sponge and it fluffed up within a few minutes. I’m gonna include pictures of before and after, which are both from today. The sponges worked great for adding multiple paint layers to my project. They are able to do both light amounts of color placement and thicker texturing paint, depending on what you are going for.
H**R
Did a perfect job, but you gotta know some things
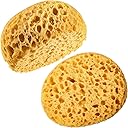
Okay, not going to bury the lede, these things did an outstanding job. I had to repair a huge water leak in a bathroom ceiling, I lost half the room's ceiling so I replaced the drywall and had to try to match the existing knockdown texture on the other half of the ceiling. I used these sponges and the result is just seamless, nobody could tell there was ever a repair done. So they're good sponges and they get a five-star review for the results. But you also gotta know a couple of things. First, what you get is not what you think you're getting. You don't get a fluffy squishy sponge, instead you get something that looks like a nasty old McDonald's Happy Meal hamburger that's been vacuum-sealed in a NASA space meal pouch. It's a little tiny flat squished thing that would absolutely not pass any "is this a sponge?" test. Second, you gotta inflate it. They say leave it in a pan of water for a little while. Screw that, I left one in a pan of water and it took like TWO DAYS to fully fluff up. If you don't have two days to wait, submerge it in water and work it, squeeze it, roll it, smush it, etc, until it finally becomes a small half-dome shape. It'll get about as big as your palm, flat on one side and rounded on the other, and probably smaller than you were expecting. Don't sweat it, it's all good; once you get to that point you've got what you need. Then start the texturing job. Thin down some all-purpose joint compound in a drywall pan, and let it "set up" for about 10 minutes or so. Then smush the flat side of the sponge into it, then sqlorch it onto the ceiling, press it in, and then yank the sponge away quickly. You're trying to "draw out" the compound to stick out away from the ceiling, making little stalagtites. Do that for a while, I think I probably did it in about a 3' x 3' area before knocking it down with a rubber-edged knockdown knife. If it looks good and matches up, then go on to the next 3x3 area. If it looks bad, you can just re-sqlorch it and try again until you get it the way you want. It's a long tedious process, but the end result I got is absolutely fantastic. If you want to see a video, I watched Paul Peck's youtube drywall channel on matching knockdown texture and it tells you everything you need to know.
P**Y
Great sponges, good price
These are great paint sponges! They are and super easy to use. I made a lettuce planter out of a wood palette and use the to decorate the outside. They are thick, soft, hold paint well, and wash out with soap and water. They held up really ell with no shedding or flaking. I like that they’re designed rounded on one side and flat on the other. It makes it easy to paint small or large areas quickly and gives great control in tight spaces. Highly recommend!
J**F
Doesn't work well at all and smaller than advertised.
2 shrink wrapped sponges, one finally expanded after 24-36 hours, the other still a smashed pancake after 48 hours (and it's smaller than expected like other said). Tried using the one that did expand and it didn't work well to dab the mud in a way that could be knocked down for the knock down texture look. It laid down too much mud and only barely left tiny points when pulling the sponge away. Basically it would either leave too much mud or not enough mud. Nothing like what I've seen in videos of other people using texture sponges. After letting it set for a few minutes and knocking it down with a knockdown knife, there are very wide smooth areas in many spots because the mud was too uniformly laid down. Maybe if it had only a tiny blob of mud on the sponge and I separated the blobs by a couple inches, it might have worked? ...but then I would have had to do several applications/layers to get the overall knockdown look. Bottom line, didn't work well at all. Maybe a bigger sponge with bigger holes would do the trick.
G**T
Good
It did the job, glad I got 4. Used 2 just to do a room
Trustpilot
1 month ago
2 days ago